Sites built with STUDIO look good. A few weeks after launch, though, the contact form starts filling with the same questions. "How much does it cost?" "Which areas do you cover?" "How long does onboarding take?"
The answer is somewhere on the site, but the visitor could not find it, so they opened the form. And while they wait for a reply, they are contacting someone else. A window that answers on the spot closes that gap.
This article walks through installing an AI chatbot on a STUDIO site, following the actual settings screen. It also covers the STUDIO-specific behavior where nothing appears in preview, and why the Embed box is the wrong place to paste a chat widget. Without knowing these two things, you will think a correct setup is broken.
What this article covers
- Why custom code is the only real route for a chatbot on STUDIO
- The three-step installation procedure
- Why a paid plan is required, and how to think about that cost
- The STUDIO-specific behavior behind most "I pasted it but nothing shows" reports
- How to think about LINE and about an online store running elsewhere
1. On STUDIO, the place is custom code
STUDIO has no way to edit HTML files directly. What you build in the design editor becomes the published site. That leaves custom code as the only entry point for an external script.
Custom code lets you insert your own code just before </head> and just before </body>. It is the standard mechanism, the same one used for analytics and ad tags, and a chatbot goes here.
The Embed box will not work
STUDIO has one other place that accepts code: the Embed (Blank) box you can place from the add panel. You can write HTML and JavaScript in it, so many people try there first. It is not suitable for a chat widget.
The reason is that the contents of an Embed box are rendered inside an iframe. An iframe draws only within its own frame. A chatbot is designed to float fixed at the bottom-right of the screen and expand when clicked, so trapped inside a box, the button gets clipped and the panel cannot open past the frame.
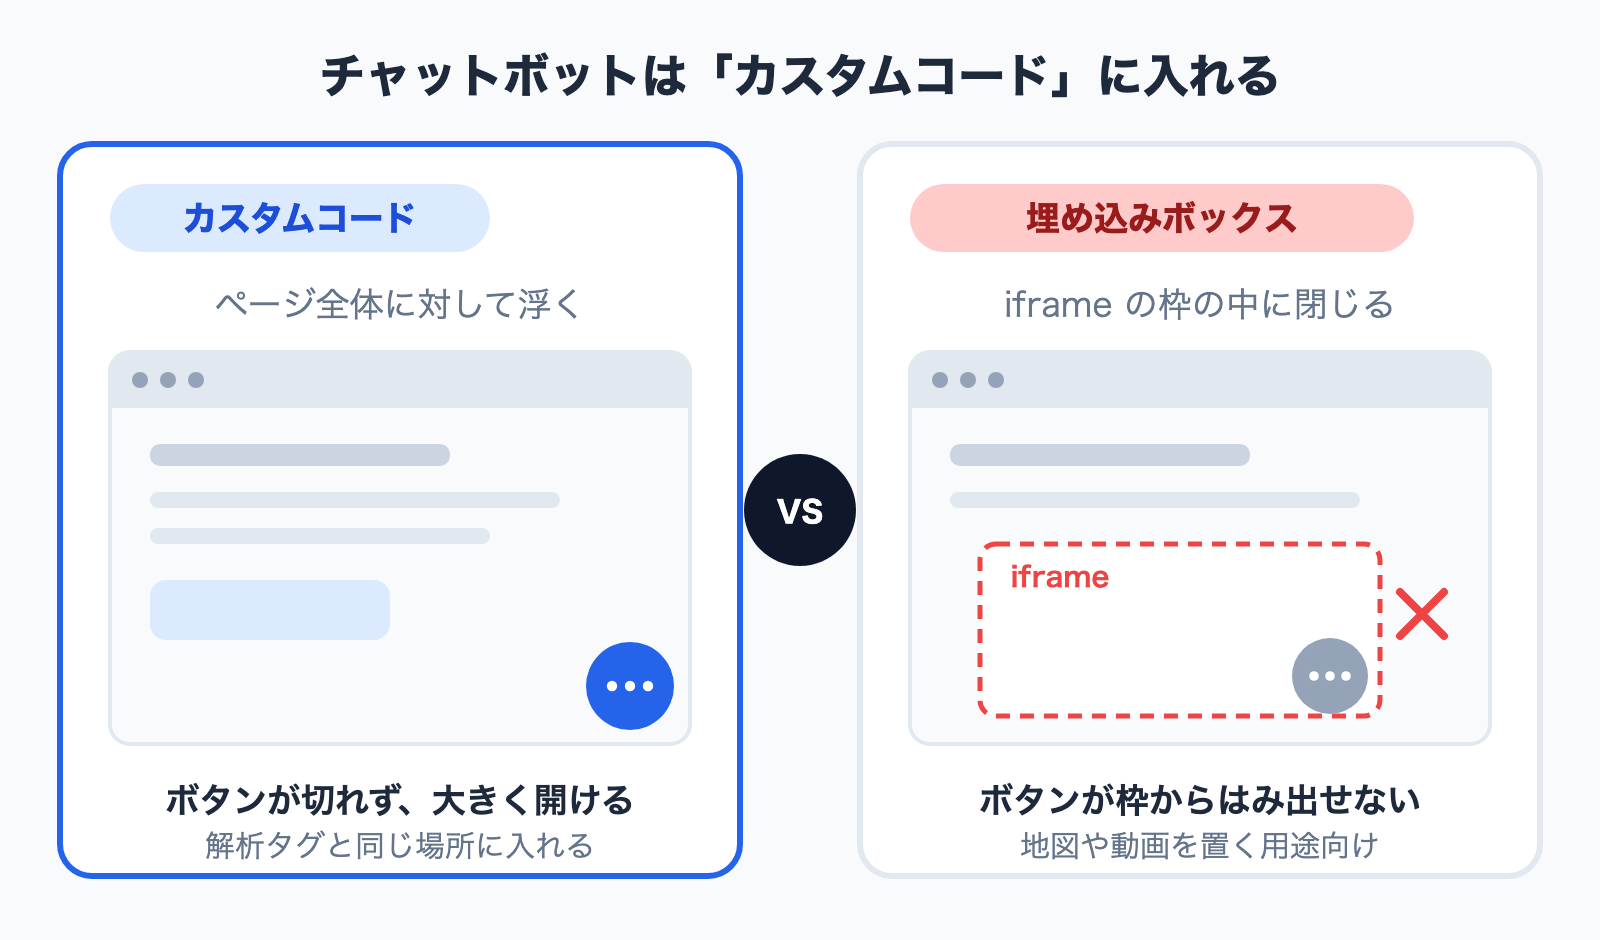
Anything meant to float over the entire page -- a chatbot included -- belongs in custom code. The Embed box is for things you want at a specific place and size: maps, videos, forms.
2. Installation (three steps)
The example below uses Monoshiri AI, the product we build. It takes about five minutes, and you never write code.
Step 1: Get the embed snippet
Create a Monoshiri AI account, create a widget in the admin, and copy the embed snippet. It is a single script tag:
<script async src="https://monoshiri.ai/widget/embed.js" data-api-key="(your issued key)" data-api-url="https://api.monoshiri.ai"></script>
You do not need to register the destination domain in advance. The same snippet works on a studio.site subdomain and on a site with a custom domain attached.
Step 2: Open the custom code settings
Open your project in the STUDIO design editor and find the custom code fields. Click the grey area outside the canvas to open the right-hand panel, and you will see settings split into tabs: one that applies to the whole site, and one that applies per page.
A chatbot should appear everywhere, so choose the site-wide side.
The editor UI does get updated. If the menu names differ from what you see here, search STUDIO's official help for "custom code" and check the current location.
Step 3: Paste before </body>, then publish
Custom code offers two slots: just before </head> and just before </body>. Put the chatbot just before </body>.
The </head> slot runs before the page itself is built, so it is the slot most likely to affect perceived load speed. A chat widget only needs to appear at the bottom-right after the page has rendered, which makes the closing tag the better fit.
Save, then publish. That last word matters more than it sounds -- the next section explains why.
Full requirements with screenshots are on the STUDIO integration page. For widgets in general, beyond STUDIO, see the chat widget implementation guide.
3. Most failures are "I checked in preview"
This is the single most common stumble on STUDIO.
Custom code does not run in the design editor or in preview. STUDIO's official help states plainly that added code will not run in the design editor or live preview, and that you should test it on your published site.
So the setup can be entirely correct and still show nothing at the bottom-right as long as you are looking at preview. If you conclude the settings are wrong at this point and start re-pasting, or move the snippet into an Embed box, you end up chasing a problem that never existed.
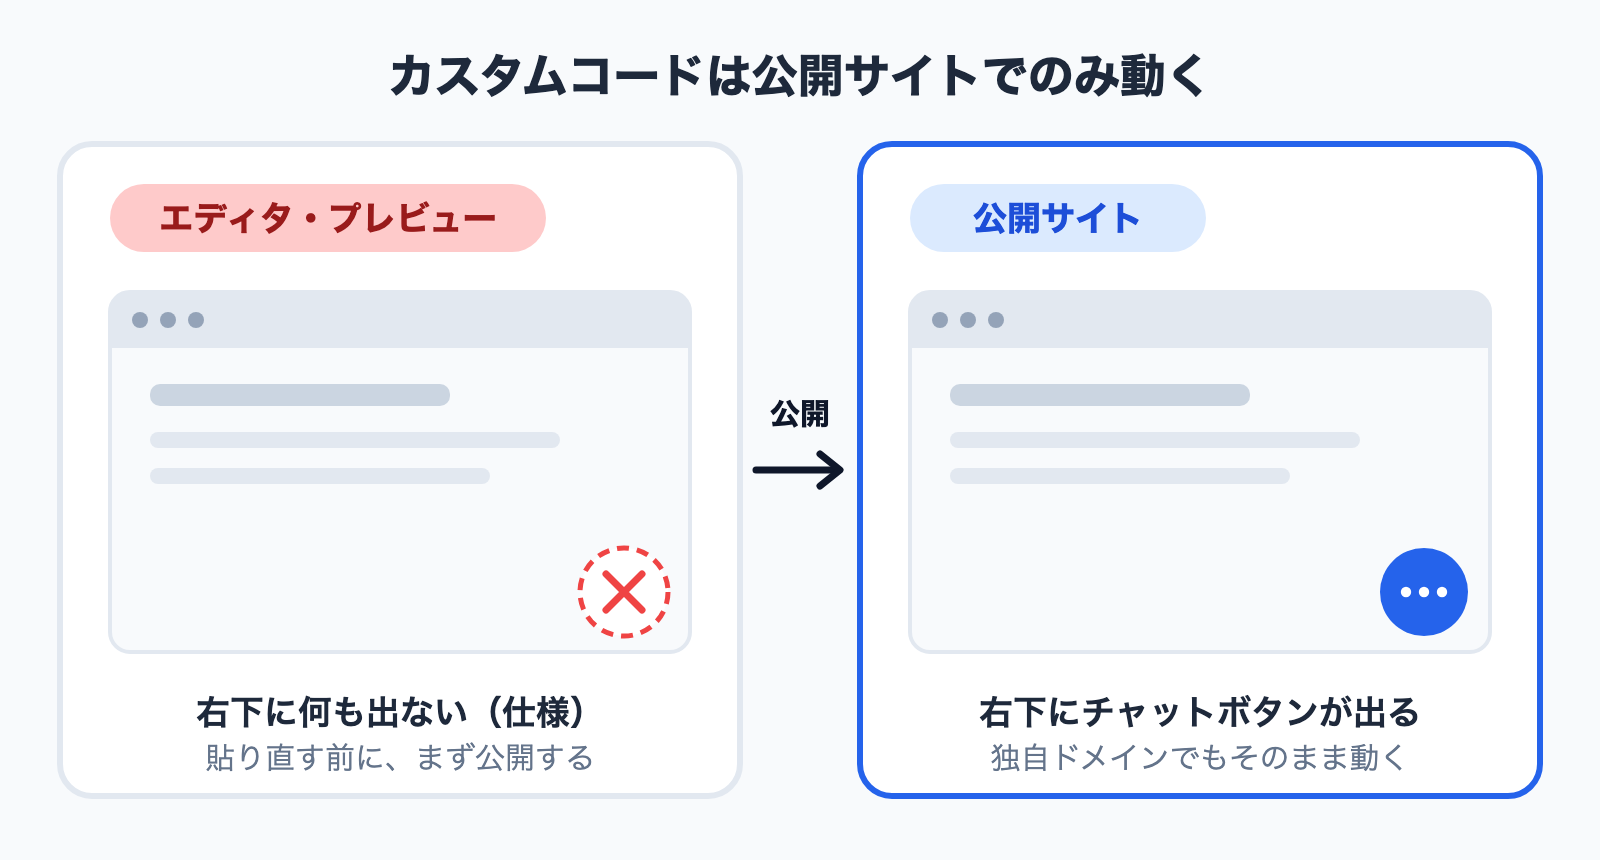
Check it this way instead.
- Paste into custom code and save
- Publish
- Open the published URL (
studio.siteor your custom domain) in a browser - If it still does not appear, hard-reload (Windows:
Ctrl+F5/ Mac:Command+Shift+R)
If it is still missing, check whether the widget is published on the Monoshiri AI side. A draft widget renders nothing, no matter where the snippet sits.
Specs worth knowing up front
From the official help, the parts that matter in practice:
- Only a limited set of tags is allowed just before
</head>(link,meta,style,script,noscript). A chatbot is ascripttag so either slot accepts it, but the</body>slot is the recommendation - Up to 10 code blocks each for the
</head>and</body>slots, with up to 30,000 characters per field. Normal use, even alongside analytics tags, will not reach these limits - Both site-wide and per-page settings exist. Code entered per page appears only on that page. Put the chatbot on the site-wide side
4. Why a paid plan is required, and how to think about the cost
Plainly: STUDIO's custom code is a paid-plan feature. On the free plan the field is not usable at all, so this method of installing a chatbot is not available there.
STUDIO's paid tiers start at Mini. As of September 2026 that is roughly 590 yen per month billed annually, or roughly 1,290 yen per month billed monthly. Plan structure and pricing change, so confirm the current terms on STUDIO's official pricing page before you subscribe.
Worth framing correctly: if you are using a STUDIO site for a business, you will end up on a paid plan anyway -- for a custom domain and to remove the banner. Custom code is better understood as one of the things that becomes available once you are on a paid plan, rather than a reason to upgrade on its own.
The chatbot itself is a separate cost. For reference, here are Monoshiri AI's numbers.
| Free | Light | Standard | Pro | |
|---|---|---|---|---|
| Monthly (tax incl.) | 0 yen | 2,980 yen | 7,980 yen | 29,800 yen |
| AI answers per month | 150 | 1,000 | 3,000 | 20,000 |
| Folders | 1 | 5 | 10 | 30 |
| Files per folder | 30 | 100 | 300 | 300 |
| Chat widget | 1 (150/month) | 1 | 1 | 1 |
As of September 2026. See pricing for current details.
Treat the free plan as a way to confirm it works on your own site. Once a chatbot starts doing its job, 150 answers a month arrives at a pace of five a day. Conversely, if months pass without hitting the cap, you have learned something real: the volume of inbound questions is genuinely low.
The ways "free" gets sliced are laid out as three patterns in how to add a chatbot to WordPress for free. The reasoning carries over to STUDIO unchanged.
5. Pairing with LINE and with a store elsewhere
A LINE link and an AI chat do different jobs
"We want LINE on our STUDIO site" comes up often, and it needs untangling.
What LINE Official Account provides is primarily a path to add you as a friend. It is not a mechanism for embedding the LINE chat screen inside your site so a conversation finishes there (specifications change, so check LINE's official documentation for the current state).
So with a LINE link on the site, the visitor has to move to the LINE app, add you as a friend, and only then ask. For someone who just wants an answer right now, that is three steps of friction.
The practical split looks like this.
- Questions the visitor wants answered on the spot -- answer immediately in the chat widget
- People you want an ongoing channel with -- route them to the LINE friend-add
Monoshiri AI also supports LINE integration, so the web widget and automated replies on a LINE Official Account can draw on the same documents and give the same answers. You do not maintain separate answers per channel. There is more on this in running a knowledge base through LINE.
When the online store runs on another service
A common setup is a corporate site on STUDIO with sales handled by a separate e-commerce service. In that case, paste the same snippet on both and the same chatbot runs on both. No per-domain registration means nothing to configure.
For the store side, see how to add a chatbot to Shopify and how to add a chatbot to BASE.
6. What it can answer is set by what you feed it
Installed and nothing else, a chatbot answers nothing. The quality of the documents the AI reads becomes the quality of the answers.
There are no scenario trees to design. Upload text or PDFs and the AI answers from their contents. For the corporate and service sites STUDIO is usually used for, start with these five.
- Service overview -- what you provide, what is in scope, what makes you different
- Price list -- plans, options, whether there is a setup fee
- The FAQ page -- copying what is already on the site is enough
- Onboarding flow -- the steps and timeline from inquiry to start
- Company details and coverage -- location, hours, areas served
The trick is to turn what is already on the site into files as-is. Trying to write fresh copy is what stalls the rollout.
STUDIO sites tend to prioritise design and keep the information density low, which means they accumulate questions that exist precisely because the answer is not written anywhere. Documents you give the chatbot double as a home for the detail the site could not hold.
7. The work starts after installation
A chatbot is not a set-and-forget object. Whether it pays off is decided almost entirely by whether you read the conversation logs afterwards.
Monoshiri AI's admin shows visitor questions, AI answers, and ratings. What you want is not the conversations that went well but the ones it could not answer. That list is, verbatim, the information missing from your site.
Common patterns:
- Lots of questions about coverage areas -- add a coverage document, and put it on the site too
- "Can individuals hire you?" keeps recurring -- add one sentence to the service page
- People ask about pricing edge cases -- add the conditions to the price list
The third one is the point: the questions a chatbot collects are also a list of fixes for the site. The most effective way to reduce inquiries is to make them unnecessary.
Other things that trip people up
The button overlaps something at the bottom-right. STUDIO sites often have a back-to-top button in the same corner. If they collide, you can move the button to the bottom-left from the Monoshiri AI admin.
How it looks on a phone. Most widgets switch to full-screen on smartphones. Always open the published site on a real phone after installing. Narrowing a desktop browser window hides breakage you will otherwise miss.
Interference with animation. The widget runs as an independent script anchored at the bottom-right, so it does not interfere with STUDIO's scroll effects or interactions.
It cannot book or take payment. A chatbot answers questions from documents. It does not confirm bookings or process payments. Registering a contact form URL in the widget settings gives you somewhere to send people when the AI reaches its limit.
Summary
- On STUDIO there is one place: custom code. The Embed box is confined to an iframe, so it cannot host a fixed bottom-right chat widget
- Three steps: get the snippet, open custom code, paste before
</body>and publish. About five minutes, no code writing - The biggest trap is that custom code does not run in the editor or preview. Always verify on the published site
- Custom code is paid-plan only. It cannot be installed on the free plan, and pricing changes, so check the official page before subscribing
- Up to 10 code blocks per slot, 30,000 characters per field
- The snippet needs no per-domain registration -- it works on
studio.siteand on a custom domain - LINE does not finish a conversation inside your site, so split the roles: the widget for on-the-spot questions, LINE for ongoing contact
- Answer quality is set by document quality. Copy the service overview, price list, FAQ, onboarding flow, and company details from existing pages
- After installing, read the logs and feed unanswered questions back into both the documents and the site itself
Share this article
Related Articles
How to Add a Chatbot to Wix -- The Custom Code Method, Step by Step (2026)
How to install an AI chatbot on a Wix site, following the actual dashboard screen. Covers why a connected domain is a prerequisite, the spec where changing domains deletes your snippet, and how it differs from the built-in chat.
How to Add a Chatbot to Shopify -- The Custom Liquid Method, No App Required (2026)
Three ways to install a chatbot on a Shopify store, compared, plus the step-by-step Custom Liquid method that needs no app. Covers the theme-swap trap that silently removes it, why it cannot appear on checkout, and how far a free plan goes.
How to Add a Chatbot to BASE -- A Free Setup via the HTML Tag App (2026)
A step-by-step guide to putting an AI chatbot on a BASE online shop using the HTML Tag Management app. What the free tier covers, which documents make it answer shipping and return questions, and what to check when the button never appears.


![Automate Website Inquiries with AI -- A Chat Widget Implementation Guide [2026 Edition]](/blog/chat-widget-guide/header.jpg)